Integrating the TailorTalk Widget
Follow these steps to add the TailorTalk Widget to your website and customize its appearance and behavior.
Step 1: Navigate to Website Integration
- Go to the Agent Page in your TailorTalk dashboard.
- Click on the
Websiteintegration option.

Step 2: Configure Your Widget
Fill in the Widget Configuration Form
Enter your desired widget name and the URL of your website in the widget configuration form.
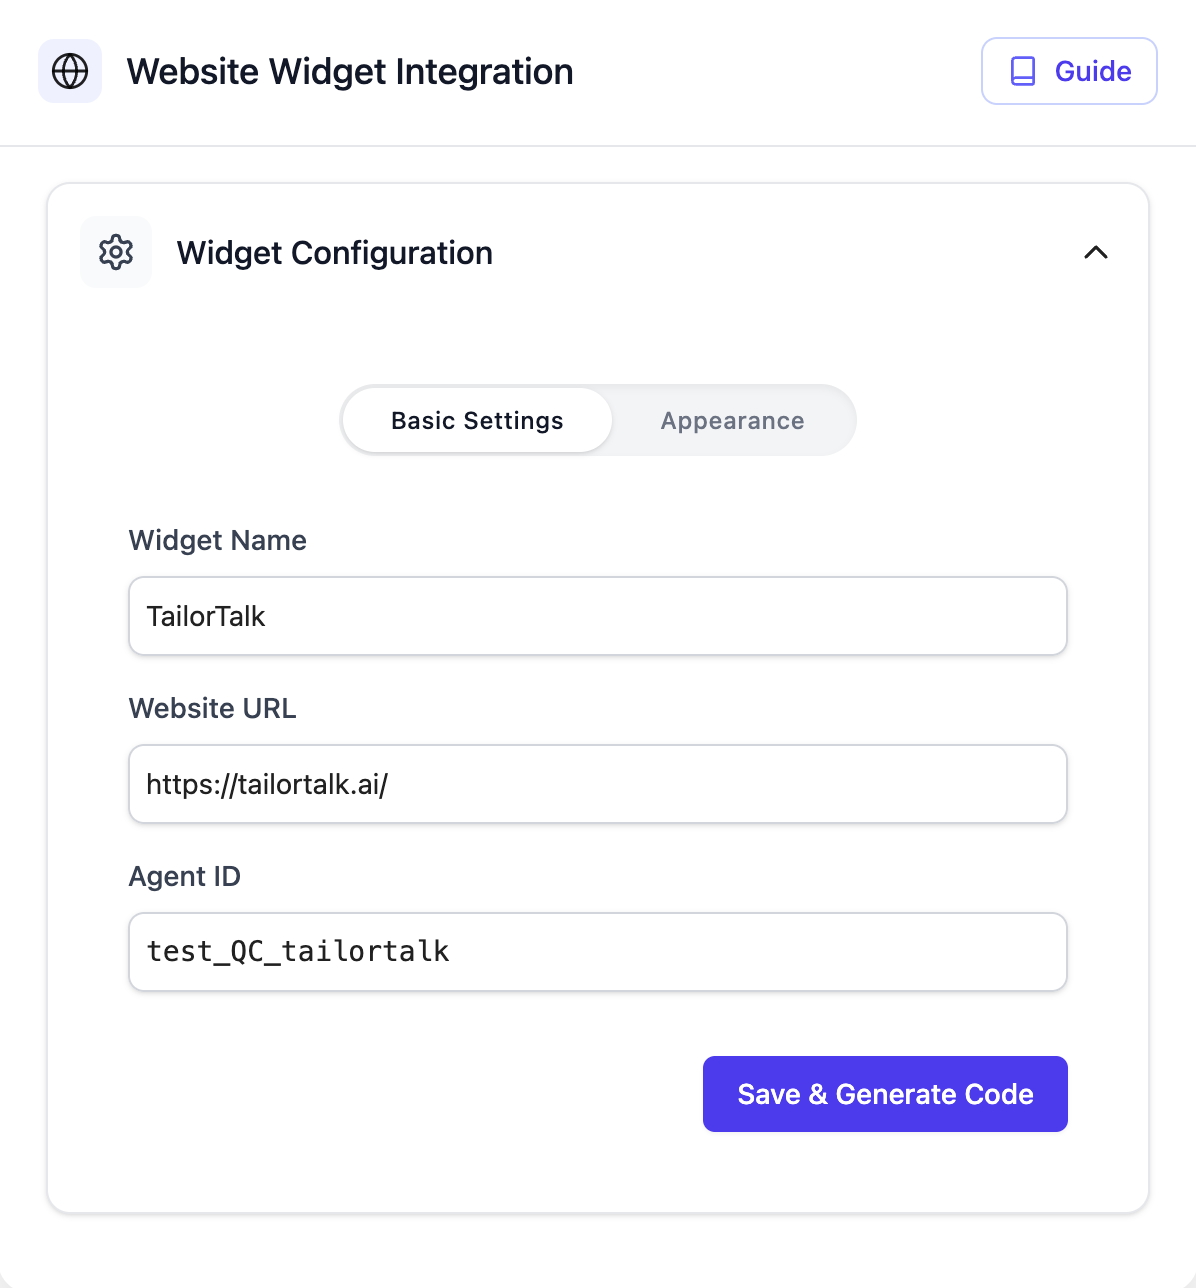
Adjust the Widget Appearance
Customize the appearance of your widget using the available options in the configuration form.

Widget Parameters
| Parameter | Type | Default | Description | Required |
|---|---|---|---|---|
| widgetName | string | (to be filled) | Name of the widget. | Yes |
| websiteUrl | string | (to be filled) | The website where the widget will be used. | Yes |
| agentId | string | (auto-filled) | The agent ID for the widget. | Yes |
| color | string | '#6366f1' | Widget primary color (hex code). | Yes |
| position | string | 'bottom-right' | Position of the widget on the screen. | Yes |
| buttonText | string | 'Let's Chat' | Text displayed on the widget button. | No |
| buttonWidth | number | 150 | Width of the widget button in pixels. | No |
| buttonHeight | number | 40 | Height of the widget button in pixels. | No |
| welcomeMessage | string | (default message) | Welcome message shown to users. | No |
Step 3: Save & Generate Code
- Click Save & Generate Code.
- Choose your Integration method (e.g., HTML, React, etc.).
- Copy the generated code snippet.
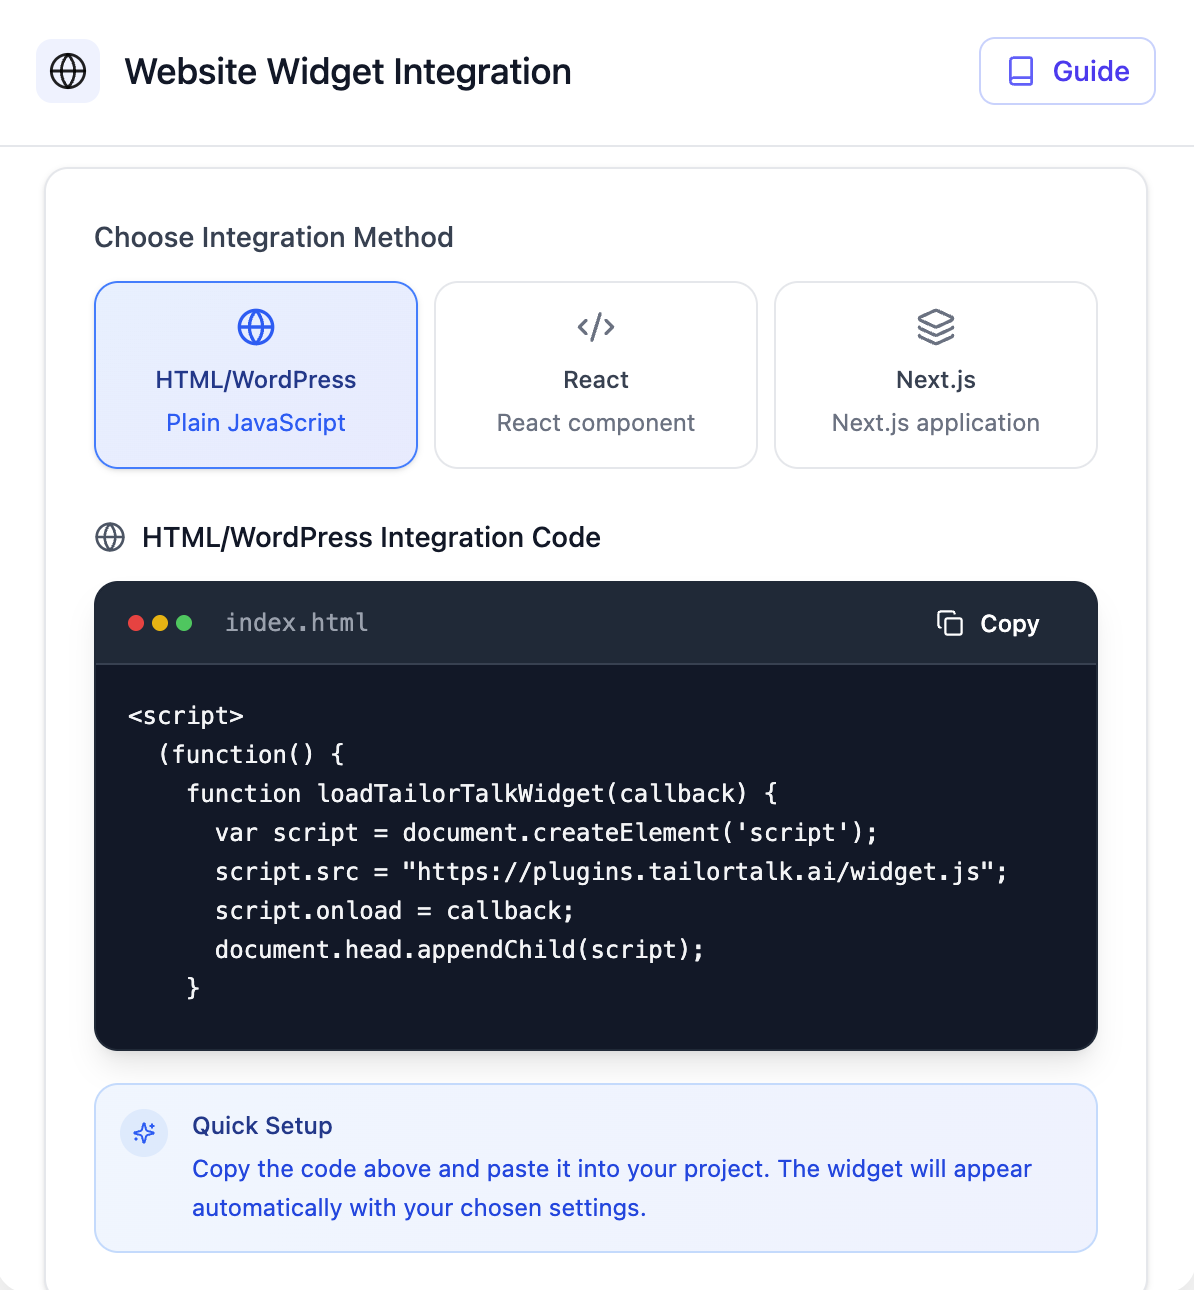
Step 4: Add the Widget Code to Your Website
Choose your integration method and add the code as follows:
HTML Website:
Paste the code just before the closing</body>tag in your main HTML file (e.g.,index.html).React Application:
Place the code inside auseLayoutEffect(oruseEffect) in your main component (e.g.,App.js).
You can also create a dedicated component for the widget.Next.js Application:
Use the code in your main layout or page file.
Make sure to importnext/scriptasScript.
Example Integration Code
Choose your integration method and use the corresponding code snippet below.
Replace the values as needed for your configuration.
HTML Website
<script>
  (function() {
    function loadTailorTalkWidget(callback) {
      var script = document.createElement('script');
      script.src = "https://plugins.tailortalk.ai/widget.js";
      script.onload = callback;
      document.head.appendChild(script);
    }

    loadTailorTalkWidget(function() {
      TailorTalk.init({
        widgetName: "YOUR_WIDGET_NAME",
        agentId: "YOUR_AGENT_ID",
        color: "#6366f1",
        position: "bottom-right",
        options: {
          buttonText: "Let's Chat",
          buttonWidth: 150,
          buttonHeight: 40,
          welcomeMessage: "Hello! How can I assist you today?"
        }
      });
    });
  })();
</script>
React Application
import React from "react";

React.useLayoutEffect(() => {
  if (!document.getElementById("tailortalk-widget-script")) {
    const script = document.createElement("script");
    script.id = "tailortalk-widget-script";
    script.src = "https://plugins.tailortalk.ai/widget.js";
    script.async = true;
    document.body.appendChild(script);

    script.onload = () => {
      window.TailorTalk && window.TailorTalk.init({
        widgetName: "YOUR_WIDGET_NAME",
        agentId: "YOUR_AGENT_ID",
        color: "#6366f1",
        position: "bottom-right",
        options: {
          buttonText: "Let's Chat",
          buttonWidth: 150,
          buttonHeight: 40,
          welcomeMessage: "Hello! How can I assist you today?"
        }
      });
    };
  }

  return () => {
    const container = document.querySelector(".tt-widget-container");
    if (container) container.remove();
  };
}, []);
Next.js Application
import Script from "next/script";

<>
  <Script src="https://plugins.tailortalk.ai/widget.js" strategy="afterInteractive" />
  <Script id="tailortalk-init" strategy="afterInteractive">{`
    function initTailorTalkWidget() {
      if (window.TailorTalk && window.TailorTalk.init) {
        window.TailorTalk.init({
          widgetName: "YOUR_WIDGET_NAME",
          agentId: "YOUR_AGENT_ID",
          color: "#6366f1",
          position: "bottom-right",
          options: {
            buttonText: "Let's Chat",
            buttonWidth: 150,
            buttonHeight: 40,
            welcomeMessage: "Hello! How can I assist you today?"
          }
        });
      } else {
        setTimeout(initTailorTalkWidget, 100);
      }
    }
    initTailorTalkWidget();
  `}</Script>
</>
Tip:
- For all methods, replace the sample values with your actual configuration.
- If you use another framework, ensure the script loads after the DOM is ready and the widget is initialized as shown.
Confirmation
Once integrated, your TailorTalk widget will appear on your website, ready to assist your visitors.
By following these steps, you can easily integrate and customize the TailorTalk Widget to match your website's style and user experience.